Axios前后端交互实例
Axios前后端交互实例
何平安什么是前后端联调?
在我们开发的过程中,发送请求的ajax数据都不是后端返回的真数据,而是我们自己通过接口mock模拟的假数据,当前端的代码编写完成后,后端的接口也写好后,我们就需要把mock数据换点,尝试使用后端提供的数据,进行一个前后端的调试,我们会把这个过程叫做前后端接口联调。
真正的零基础都是从安装开始的AwA
编译器选择IDEA:附赠激活码:IntelliJ IDEA2023.2 破解 永久激活 最新版IDEA激活 亲测可用! - 爱激活网 (aijihuo.cn)
Node.js: 下载 | Node.js 中文网 (nodejs.cn)选择对应版本,安装程序除了安装地址以外其它都是默认就行
nginx:nginx: download
MySQL:超详细MySQL安装及基本使用教程 - 知乎 (zhihu.com)
先来介绍下前后端是怎么连接交互的:
一般是前端设计界面,向后端发送一些请求,而发送请求的技术选用的是Ajax,但现在流行的一般都是先转换成Json格式来交互数据的,
Ajax
先来说说什么是Ajax
异步 JavaScript 和 XML,或 Ajax 本身不是一种技术,而是一种将一些现有技术结合起来使用的方法,包括:HTML 或 XHTML、CSS、JavaScript、DOM、XML、XSLT、以及最重要的 XMLHttpRequest 对象。当使用结合了这些技术的 Ajax 模型以后,网页应用能够快速地将增量更新呈现在用户界面上,而不需要重载(刷新)整个页面。这使得程序能够更快地回应用户的操作。Ajax 最吸引人的特性是它的“异步”性质,这意味着它可以与服务器通信、交换数据并更新页面,而无需刷新页面。
尽管 Ajax 中的 X 代表 XML,但是 JSON 才是首选,因为它更加轻量,而且是用 JavaScript 编写的。在 Ajax 模型中,JSON 和 XML 都被用来包装信息
HTTP请求报文格式与参数
行: POST /s?ie=utf-8 HTTP/1.1
头: Host: hepingan.top
Cookie: a=name=hepingan
Content-type: application/x-www-form-urlencoded
User-Agent: chrome 83
空行
体 username=admin&password=admin
上面的就是一个http请求的例子,下面就是响应报文的例子
行 HTTP/1.1 200 OK
头 Content-Type: text/html;charset=utf-8
Content-length: 2048
Content-encoding: gzip
空行
体
….
首先先搞后端,我用的是java 的springboot框架,创建时选择如下配置:


springboot的版本尽量选低点,不然不兼容出问题。jdk版本我选的是11.
打开pom.xml并在denpendences里引入mybatis的坐标:
1 | <dependency> |
然后将application的文件格式给成yml,并输入:
1 | server: |
password 和url的数据库名记得换成自己的!我这里写的后端端口为9090;
引入数据库:
右边选择数据库并添加数据源,选择mysql。

username输入root,password就是你的密码。
然后创建一个表,mysql创建语句:
1 | create table teacher |
然后再在idea自带的数据库表格编辑里添加几个数据方便测试。
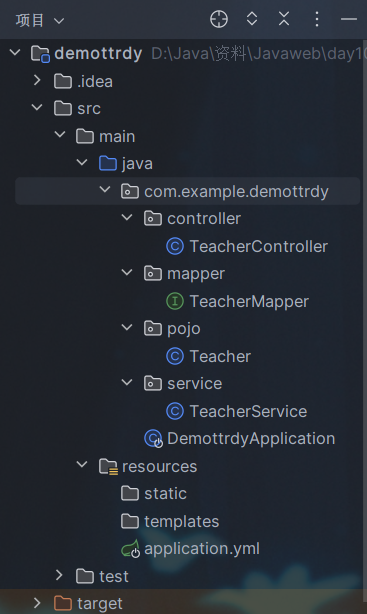
然后创建下面的包:
先编辑TeacherController:
1 |
|
大概意思就是一个/teacher的接口里有get形式查询teacher表的请求和根据id查询的接口。
然后再在TeacherMapper里编写:
1 |
|
然后启动项目:

然后在浏览器输入localhost:9090/teacher/和localhost:9090/teacher/1,如果有结果就说明成功了。
接下来是前端:
直接随便创建个html文件,里面就编写:
1 |
|
记得引入axios的依赖,使用node的指令(node安装教程:【精选】Node.js和Vue的安装与配置(超详细步骤)_nodejs安装vue-CSDN博客或者我后面的文章:通过node.js部署vue项目 - 何平安 - 博客园 (cnblogs.com))在当前项目下输入npm install axios或者直接在html中输入
1 | <script src="https://unpkg.com/axios/dist/axios.min.js"></script> |
然后再运行浏览器打开就可以看到成果了。