IT笔记捣鼓vue知识+调用后端
何平安 创建vue 项目教程:通过node.js部署vue项目 - 前端 | 练竹园 = 何平安 = 世界很大,代码连接世界 (hepingan.top)
项目目录介绍:
路由就是一个url地址,看App.vue的代码和index.js就知道了
Element-ui
官网:组件 | Element
就是一个好看的组件库,不用你自己写css了。
推荐使用 npm 的方式安装,它能更好地和 webpack 打包工具配合使用。
CDN
目前可以通过 unpkg.com/element-ui 获取到最新版本的资源,在页面上引入 js 和 css 文件即可开始使用。
1
2
3
4
|
<link rel="stylesheet" href="https://unpkg.com/element-ui/lib/theme-chalk/index.css">
<script src="https://unpkg.com/element-ui/lib/index.js"></script>
|
引入使用:
在 main.js 中写入以下内容:
1
2
3
4
5
6
7
8
9
10
11
| import Vue from 'vue';
import ElementUI from 'element-ui';
import 'element-ui/lib/theme-chalk/index.css';
import App from './App.vue';
Vue.use(ElementUI);
new Vue({
el: '#app',
render: h => h(App)
});
|
以上代码便完成了 Element 的引入。需要注意的是,样式文件需要单独引入。
按需引入
借助 babel-plugin-component,我们可以只引入需要的组件,以达到减小项目体积的目的。
首先,安装 babel-plugin-component:
1
| npm install babel-plugin-component -D
|
然后,将 .babelrc 修改为:
1
2
3
4
5
6
7
8
9
10
11
12
| {
"presets": [["es2015", { "modules": false }]],
"plugins": [
[
"component",
{
"libraryName": "element-ui",
"styleLibraryName": "theme-chalk"
}
]
]
}
|
接下来,如果你只希望引入部分组件,比如 Button 和 Select,那么需要在 main.js 中写入以下内容:
1
2
3
4
5
6
7
8
9
10
11
12
13
14
15
| import Vue from 'vue';
import { Button, Select } from 'element-ui';
import App from './App.vue';
Vue.component(Button.name, Button);
Vue.component(Select.name, Select);
new Vue({
el: '#app',
render: h => h(App)
});
|
测试组件
随便测试个组件,我这里拿个按钮:直接在App.vue里写
1
2
3
4
5
| <template>
<div id="app">
<el-button type="primary">主要按钮</el-button>
</div>
</template>
|
可以在assets里添加一个global.css里面写:
1
2
3
4
5
6
7
8
| body {
margin: 0;
padding: 0;
}
* {
box-sizing: border-box;
}
|
意思就是将默认的样式设置为间距为0且全部默认为盒子
有了这玩意儿写页面就简单了
调用接口
我学vue单纯只是为了调用我的后端接口,所以才学到这儿的,其实之前也在学校学了vue的,但那个真的是连vue的项目都没教你怎么创建,就叫你vue.js的一些入门语法,太垃圾了,果然IT还是要自学。
这里以登录接口为例
在src下新建个utils/request.js,里面封装一个请求后端的配置:
1
2
3
4
5
6
7
8
9
10
11
12
13
14
15
16
17
18
19
20
21
22
23
24
25
26
27
28
29
30
31
32
33
34
35
36
37
38
39
40
41
42
43
44
45
46
47
48
49
50
51
52
53
54
55
56
57
| import axios from 'axios'
import router from "@/router";
const request = axios.create({
baseURL: `http://localhost:9090`,
timeout: 30000
})
request.interceptors.request.use(config => {
config.headers['Content-Type'] = 'application/json;charset=utf-8';
let user = localStorage.getItem("user") ? JSON.parse(localStorage.getItem("user")) : null
if (user) {
config.headers['token'] = user.token;
}
return config
}, error => {
return Promise.reject(error)
});
request.interceptors.response.use(
response => {
let res = response.data;
if (response.config.responseType === 'blob') {
return res
}
if (typeof res === 'string') {
res = res ? JSON.parse(res) : res
}
if (res.code === '401') {
router.push("/login")
}
return res;
},
error => {
console.log('err' + error)
return Promise.reject(error)
}
)
export default request
|
记得去修改里面的请求地址
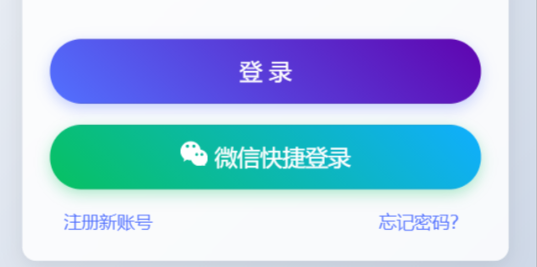
然后新建个login页面:
1
2
3
4
5
6
7
8
9
10
11
12
13
14
15
16
17
18
19
20
21
22
23
24
25
26
27
28
29
30
31
32
33
34
35
36
37
38
39
40
41
42
43
44
45
46
47
48
49
50
51
52
53
54
55
56
57
58
59
60
61
62
63
64
65
66
67
68
69
70
71
72
73
74
75
76
77
| <template>
<div class="wrapper">
<div
style="margin: 200px auto; background-color: #fff; width: 350px; height: 300px; padding: 20px; border-radius: 10px">
<div style="margin: 20px 0; text-align: center; font-size: 24px"><b>登 录</b></div>
<el-form :model="user" :rules="rules" ref="userForm">
<el-form-item prop="username">
<el-input size="medium" style="margin: 10px 0" prefix-icon="el-icon-user" v-model="user.username"></el-input>
</el-form-item>
<el-form-item prop="password">
<el-input size="medium" style="margin: 10px 0" prefix-icon="el-icon-lock" show-password
v-model="user.password"></el-input>
</el-form-item>
<el-form-item style="margin: 10px 0; text-align: right">
<el-button type="warning" size="small" autocomplete="off" @click="$router.push('/register')">注册</el-button>
<el-button type="primary" size="small" autocomplete="off" @click="login">登录</el-button>
</el-form-item>
</el-form>
</div>
</div>
</template>
<script>
import {setRoutes} from "@/router";
export default {
name: "Login",
data() {
return {
user: {},
rules: {
username: [
{required: true, message: '请输入用户名', trigger: 'blur'},
{min: 3, max: 10, message: '长度在 3 到 5 个字符', trigger: 'blur'}
],
password: [
{required: true, message: '请输入密码', trigger: 'blur'},
{min: 1, max: 20, message: '长度在 1 到 20 个字符', trigger: 'blur'}
],
}
}
},
methods: {
login() {
this.$refs['userForm'].validate((valid) => {
if (valid) { // 表单校验合法
this.request.post("/user/login", this.user).then(res => {
if (res.code === '200') {
localStorage.setItem("user", JSON.stringify(res.data)) // 存储用户信息到浏览器
localStorage.setItem("menus", JSON.stringify(res.data.menus)) // 存储用户信息到浏览器
// 动态设置当前用户的路由
setRoutes()
this.$message.success("登录成功")
if (res.data.role === 'ROLE_STUDENT') {
this.$router.push("/front/home")
} else {
this.$router.push("/")
}
} else {
this.$message.error(res.msg)
}
})
}
});
}
}
}
</script>
<style>
.wrapper {
height: 100vh;
background-image: linear-gradient(to bottom right, #FC466B, #3F5EFB);
overflow: hidden;
}
</style>
|
。。。明天再写