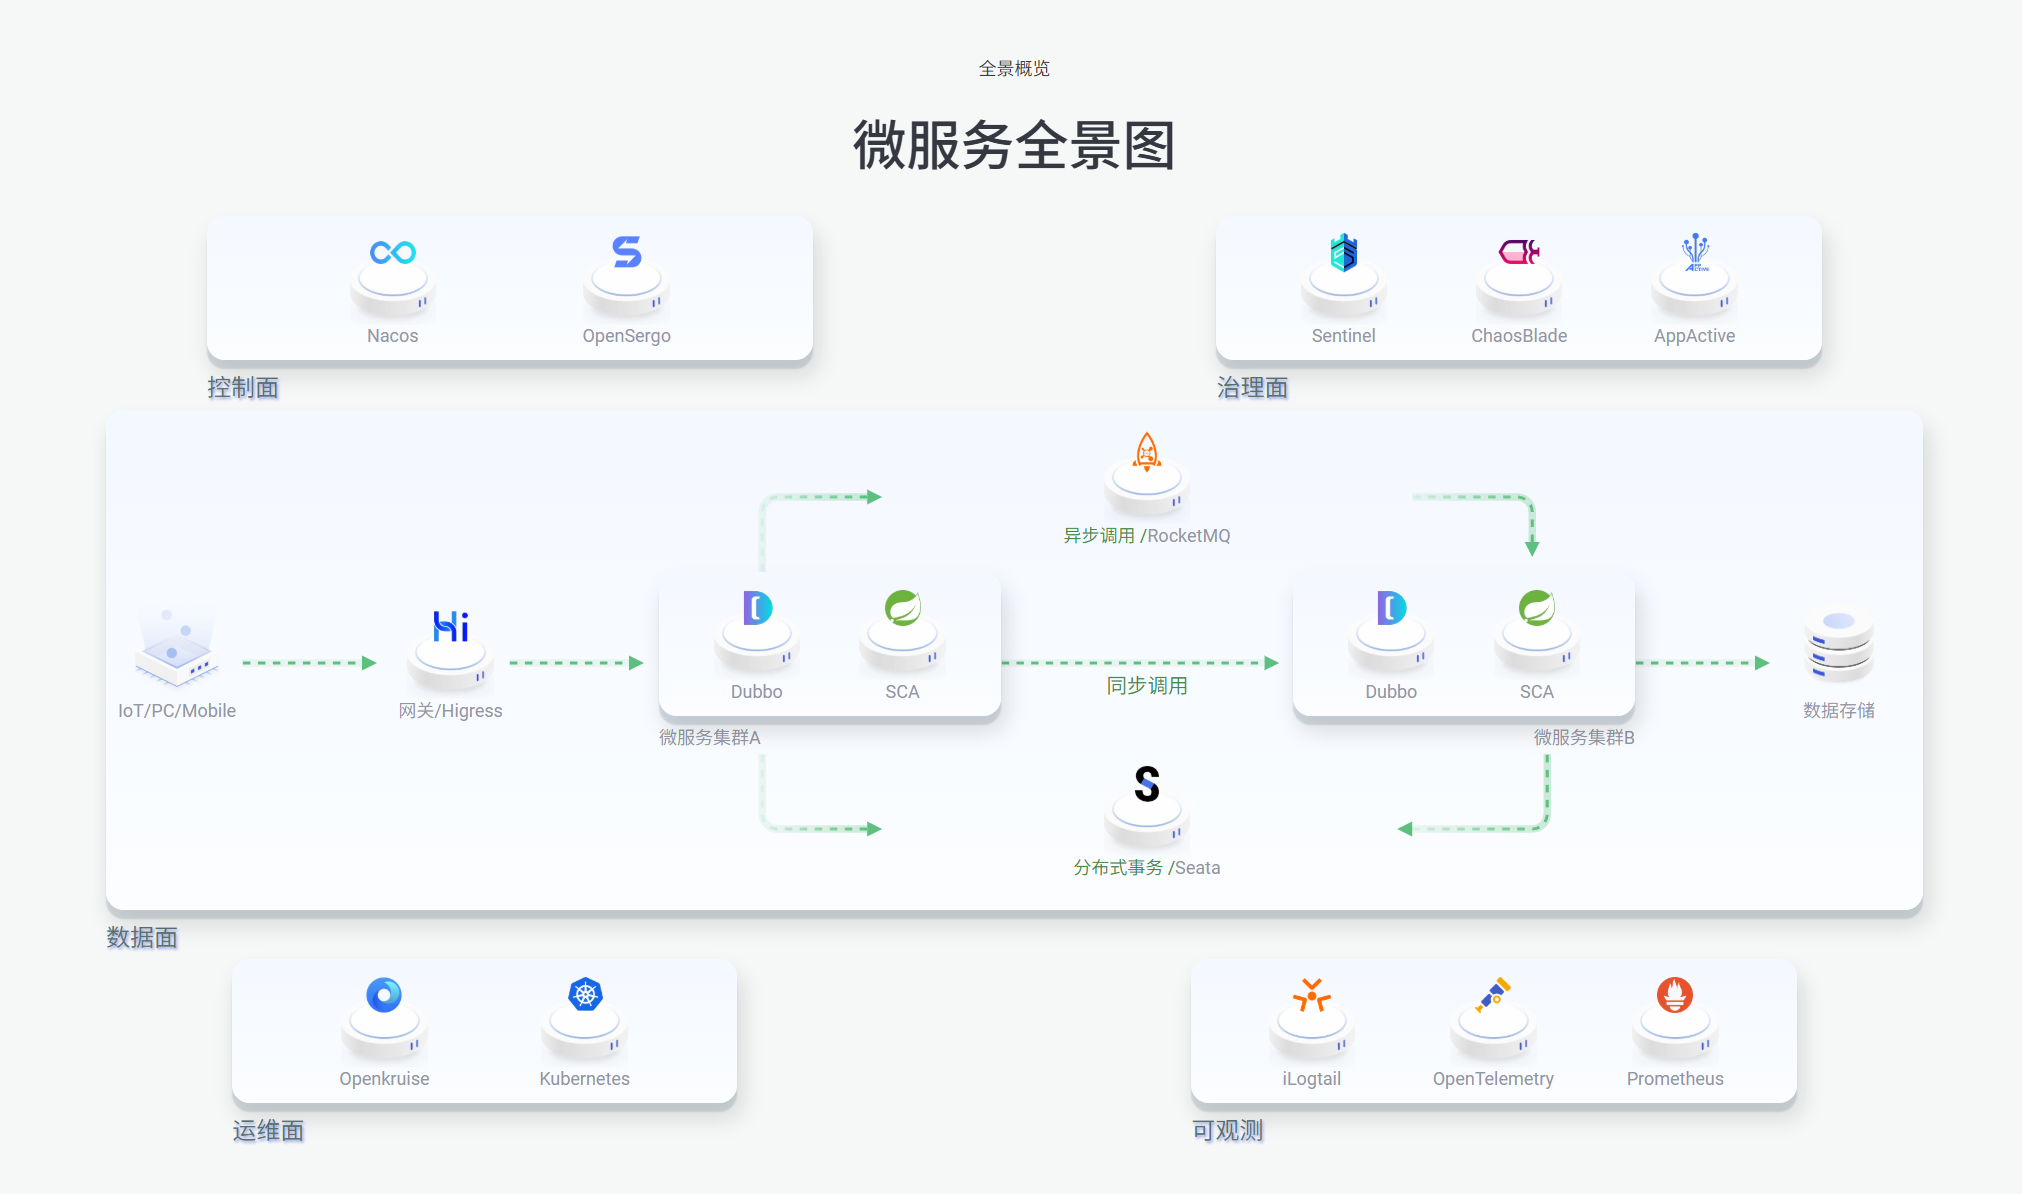
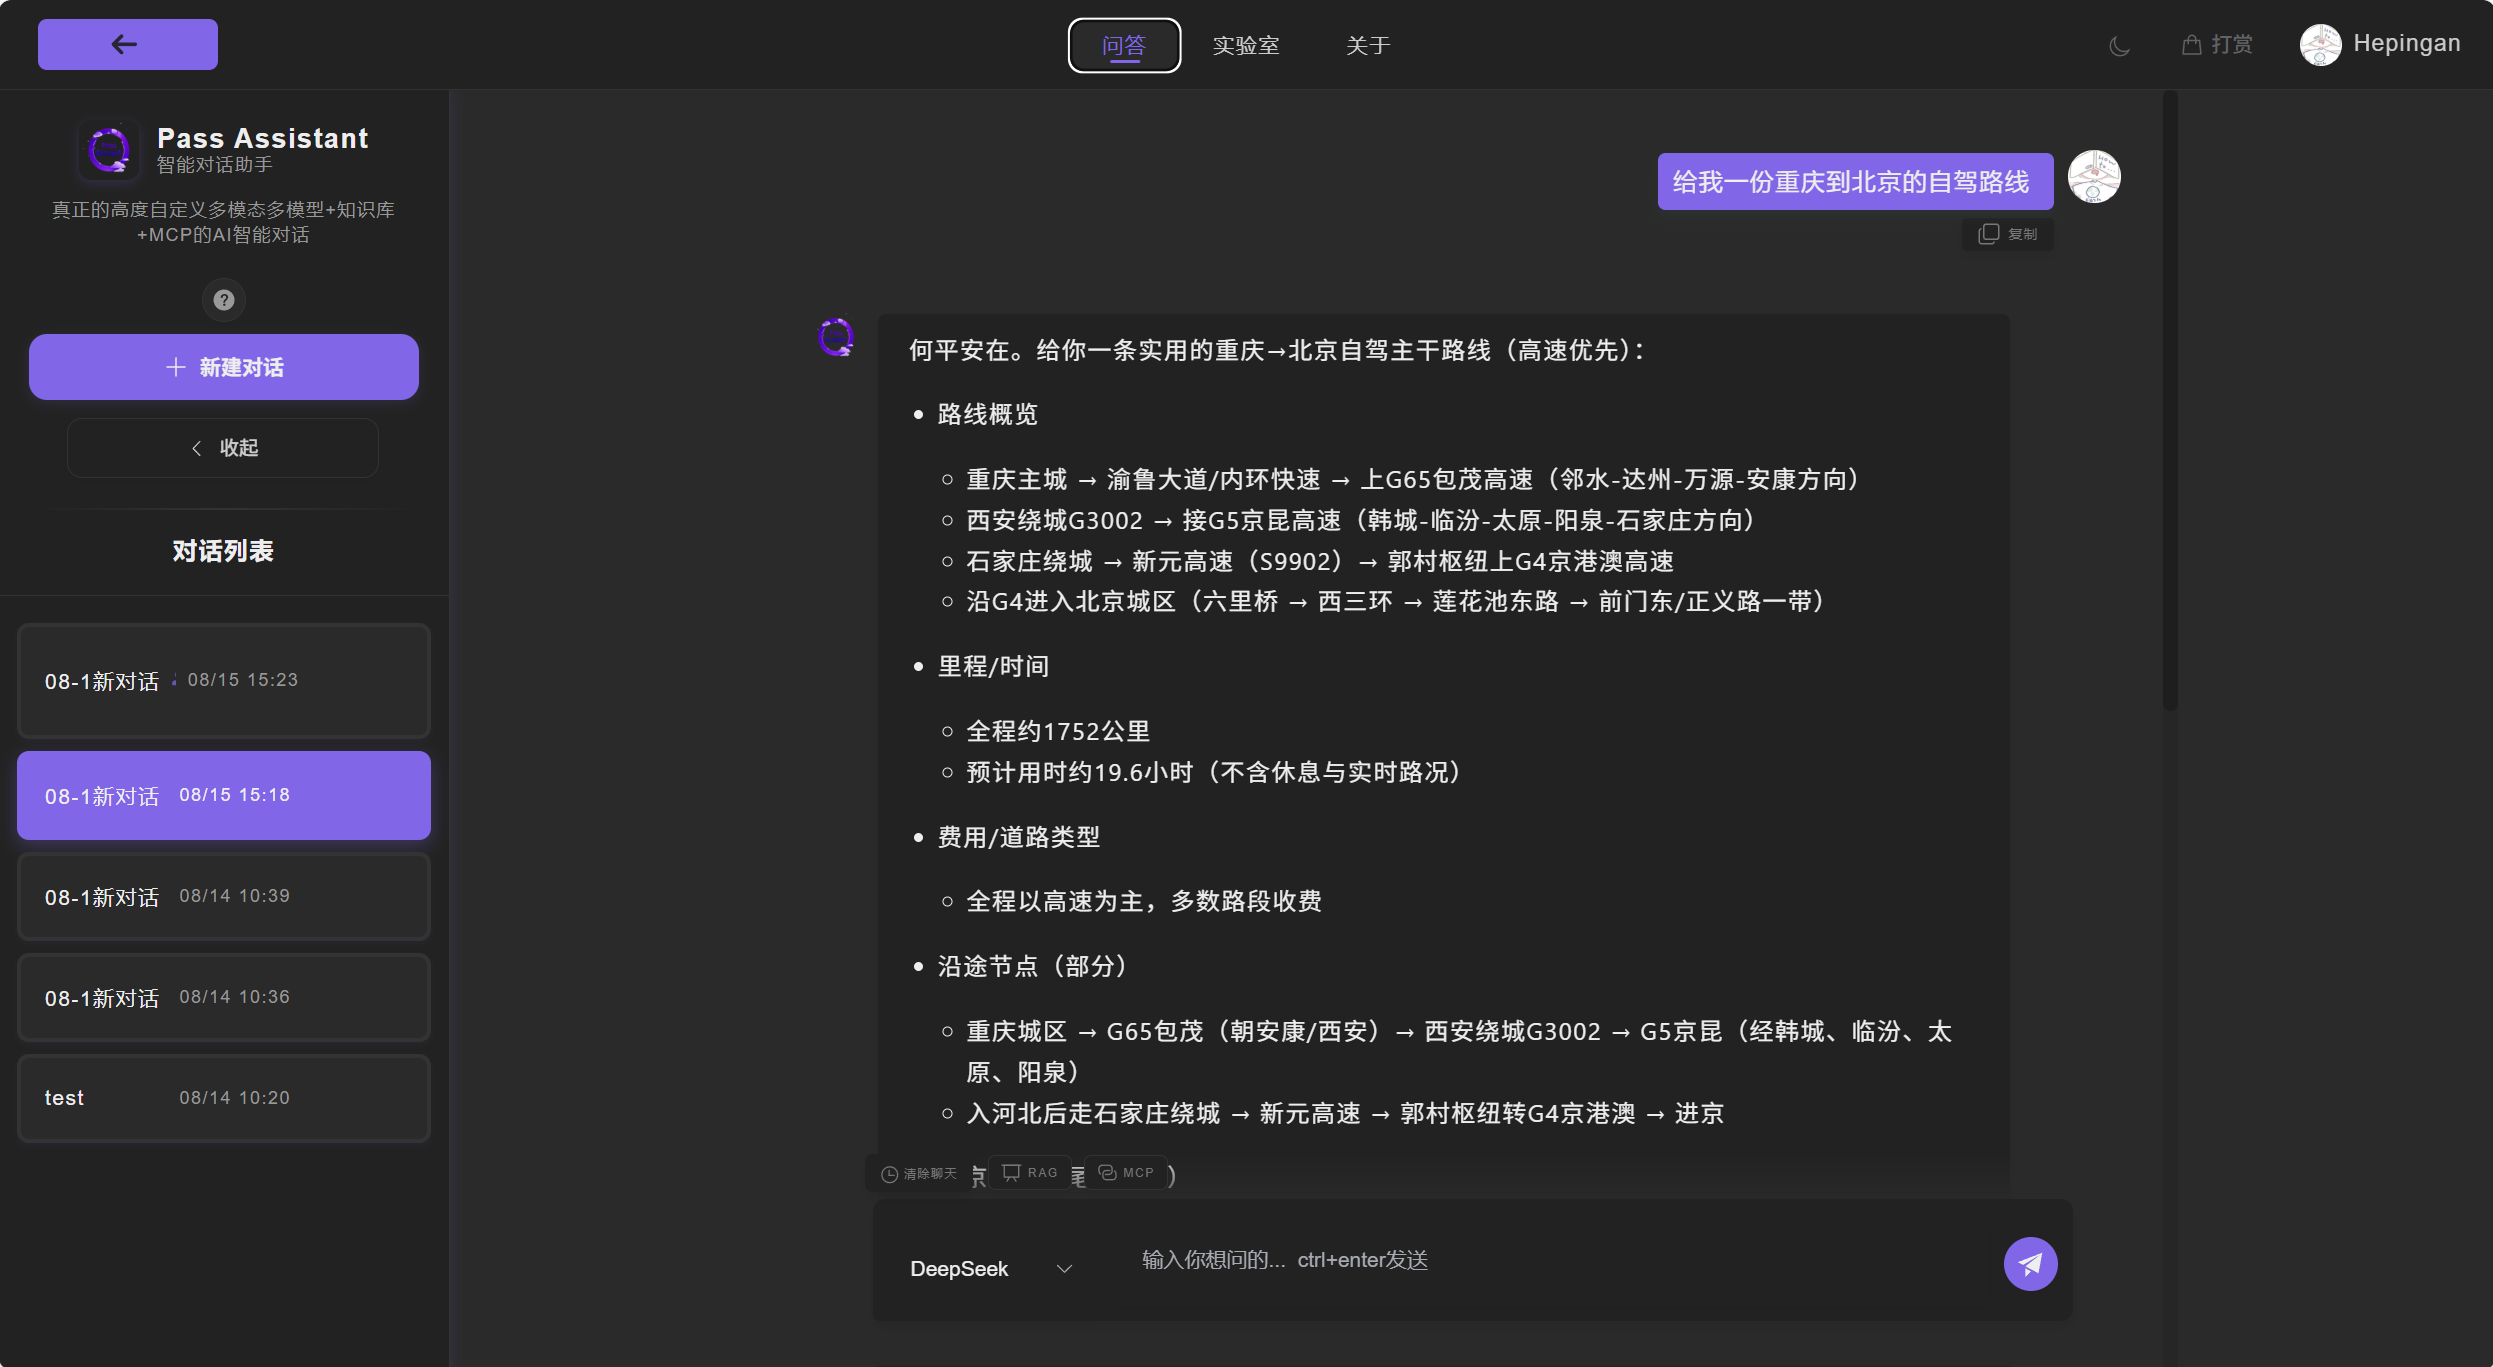
这几天打算把我的Pass Assistant拆成微服务,下面全是我踩过的坑
版本对应与pom配置 SpringCloud与Springboot版本对应关系,参考阿里官方的版本对应关系:版本说明 · alibaba/spring-cloud-alibaba Wiki
Spring Cloud Alibaba Version
Spring Cloud Version
Spring Boot Version
2022.0.0.0*
Spring Cloud 2022.0.0
3.0.2
2022.0.0.0-RC2
Spring Cloud 2022.0.0
3.0.2
2022.0.0.0-RC1
Spring Cloud 2022.0.0
3.0.0
Spring Cloud Alibaba Version
Spring Cloud Version
Spring Boot Version
2021.0.5.0*
Spring Cloud 2021.0.5
2.6.13
2021.0.4.0
Spring Cloud 2021.0.4
2.6.11
2021.0.1.0
Spring Cloud 2021.0.1
2.6.3
2021.1
Spring Cloud 2020.0.1
2.4.2
或者使用云原生应用脚手架进行构建:https://start.aliyun.com/
可以参考我的dependencyManagement配置:
1 2 3 4 5 6 7 8 9 10 11 12 13 14 15 16 17 18 19 20 21 22 23 24 25 26 27 28 29 30 31 32 33 34 35 36 37 38 39 40 41 <groupId > top.hepingan</groupId > <artifactId > Pass_Assistant_Cloud</artifactId > <version > 4.0</version > <packaging > pom</packaging > <dependencyManagement > <dependencies > <dependency > <groupId > org.springframework.cloud</groupId > <artifactId > spring-cloud-dependencies</artifactId > <version > 2022.0.0</version > <type > pom</type > <scope > import</scope > </dependency > <dependency > <groupId > com.alibaba.cloud</groupId > <artifactId > spring-cloud-alibaba-dependencies</artifactId > <version > 2022.0.0.0</version > <type > pom</type > <scope > import</scope > </dependency > <dependency > <groupId > org.springframework.boot</groupId > <artifactId > spring-boot-dependencies</artifactId > <version > ${spring-boot.version}</version > <type > pom</type > <scope > import</scope > </dependency > <dependency > <groupId > top.hepingan</groupId > <artifactId > PA-ai-service</artifactId > <version > 0.0.1-SNAPSHOT</version > </dependency > </dependencies > </dependencyManagement >
然后重新加载配置,如果src下的类有.class后缀说明已经是个微服务项目了,接下来就可以创建子模块了;
创建好后修改
1 2 3 4 5 6 <parent > <groupId > org.springframework.boot</groupId > <artifactId > spring-boot-starter-parent</artifactId > <version > 3.0.2</version > <relativePath /> </parent >
把它修改成上面那种:
1 2 3 4 5 6 <parent > <groupId > top.hepingan</groupId > <artifactId > Pass_Assistant_Cloud</artifactId > <version > 4.0</version > <relativePath /> </parent >
这样就能集成父工程的dependencies配置了
Nacos服务注册与发现 docker启动nacos后输入 ip/8848/nacos 就可以访问了
推荐添加个bootstrap.yml对nacos地址值进行配置,原因如下:
虽然在大多数情况下,在 application.yml 中配置也能工作,但使用 bootstrap.yml 有以下优势:
标准实践:这是 Spring Cloud 应用的标准做法,其他开发者更容易理解和维护
启动顺序:确保在应用完全启动前就连接到配置中心
分离关注点:将基础设施配置与应用配置分离
如果遇到启动报错:
1
2
3
4
5
6
7
8
9
Description: No spring.config.import property has been defined Action: Add a spring.config.import=nacos: property to your configuration. If configuration is not required add spring.config.import=optional:nacos: instead. To disable this check, set spring.cloud.nacos.config.import-check.enabled=false.
Spring Cloud 2022.0.x 及以上版本引入了 spring.config.import 机制,要求所有配置中心(如 Nacos、Apollo 等)必须显式声明在该配置中,目的是:
Nacos版本选择2.2.1 因为springcloud ablibaba2022.0.0版本对应的就是这个版本
nacos镜像源下载:Releases · alibaba/nacos
官方文档:Nacos Docker 快速开始 | Nacos 官网
(小Tips)特别注意:如果你删除了一个模块,重新加载父pom文件会报错提示原来的模块还在,这个时候清除本地缓存( 文件 —>清除缓存);
Spring Cloud Alibaba 不同版本对 Nacos Config 的配置方式有差异:
2021.0.1.0 及以上版本 :推荐使用 spring.config.import 引入 Nacos 配置(你目前用的方式)。旧版本(如 2.2.x) :需通过 bootstrap.yml 配置,且依赖 spring-cloud-starter-bootstrap。
2025年目前还可用的docker镜像源:
docker.1ms.run
docker.domys.cc
docker.imgdb.de
docker-0.unsee.tech
docker.hlmirror.com
cjie.eu.org
docker.m.daocloud.io
hub.rat.dev
docker.1panel.live
docker.rainbond.cc
我试了很多办法修改镜像源和宝塔添加都不行,我还自己下了源镜像还是加载不起,后来加上镜像源后就行了,例如拉取nacos2.2.1版本:
1 docker pull docker.1ms.run/nacos/nacos-server:v2.2.1
一键启动:
1
2
3
4
5
6
7
8
docker run --name nacos-standalone-derby \ -e MODE=standalone \ -e NACOS_AUTH_TOKEN=VGhpc0lzTXlDdXN0b21TZWNyZXRLZXkwMTIzNDU2Nzg= \ -e NACOS_AUTH_IDENTITY_KEY=hepingan \ -e NACOS_AUTH_IDENTITY_VALUE=1234 \ -p 8848:8848 \ -p 9848:9848 \ -d nacos/nacos-server:v2.2.1
然后配置连接:
1
2
3
4
5
6
7
spring: cloud: nacos: discovery: server-addr: 127.0 .0 .1 :8848 application: name: pa-system-service
历时3天终于研究完nacos……什么版本对应不一样,docker下载镜像老出毛病,以为springcloud问题,反正就是走过的bug以后不会走第二次了,父pom引入不进来…架构师的痛
新版本不再支持bootstrap ,所以使用的是application.yml,如果你的springcloud的版本较老(好像是2021之前的版本),仍然需要使用bootstrap.yml(因为版本的问题导致的坑真不少呀
常见报错 并不一定常见,反正我遇到的
引入了Mysql依赖但没配置数据库连接,或者暴力解决:在启动类上添加@SpringBootApplication(exclude = {DataSourceAutoConfiguration.class})
1
2
3
4
5
6
7
8
9
10
Failed to configure a DataSource: 'url' attribute is not specified and no embedded datasource could be configured. Reason: Failed to determine a suitable driver class Action: Consider the following: If you want an embedded database (H2, HSQL or Derby), please put it on the classpath. If you have database settings to be loaded from a particular profile you may need to activate it (no profiles are currently active).
请求时String报错Name for argument of type [java.lang.String] not specified, and parameter name information not available via reflection. Ensure that the compiler uses the ‘-parameters’ flag.
1 java.lang.IllegalArgumentException: Name for argument of type [java.lang.String] not specified, and parameter name information not available via reflection. Ensure that the compiler uses the '-parameters' flag.
解决方法:在父pom.xml下添加:
1 2 3 4 5 6 7 8 9 10 11 12 13 14 <build > <pluginManagement > <plugins > <plugin > <groupId > org.apache.maven.plugins</groupId > <artifactId > maven-compiler-plugin</artifactId > <version > 3.8.1</version > <configuration > <parameters > true</parameters > </configuration > </plugin > </plugins > </pluginManagement > </build >
1
2
3
4
5
6
7
8
9
10
11
12
*************************** APPLICATION FAILED TO START *************************** Description: Parameter 0 of constructor in top.hepingan.pagatewayservice.config.AuthInterfaceFilter required a bean of type 'top.hepingan.pacommon.mapper.UserMapper' that could not be found. Action: Consider defining a bean of type 'top.hepingan.pacommon.mapper.UserMapper' in your configuration.
解决方法:在对应启动类上添加注解:
1
2
3
@SpringBootApplication @MapperScan("top.hepingan.pacommon.mapper") @ComponentScan(basePackages = {"top.hepingan.pagatewayservice", "top.hepingan.pacommon"})
OpenFeign与负载均衡 OpenFeign 是 Spring Cloud 生态中的一个声明式 HTTP 客户端工具,它基于 Netflix Feign 进行了增强,专门用于简化微服务之间的 HTTP 通信。
其核心特点是声明式编程 :开发者只需定义一个接口,并通过注解(如 @FeignClient)声明要调用的服务名称和接口路径,OpenFeign 会自动生成实现类,完成底层的 HTTP 请求构建、发送和响应解析,无需手动编写 HttpClient 相关代码(如 URL 拼接、参数处理、结果转换等)。
主要作用与优势
简化远程调用
1 2 3 4 5 6 7 8 9 10 11 12 13 14 15 16 17 18 19 20 21 @FeignClient(name = "user-service") public interface UserFeignClient { @GetMapping("/users/{id}") User getUserById (@PathVariable("id") Long id) ; } @Service public class OrderService { @Autowired private UserFeignClient userFeignClient; public OrderInfo getOrderWithUser (Long orderId) { Order order = orderMapper.getById(orderId); User user = userFeignClient.getUserById(order.getUserId()); return new OrderInfo (order, user); } }
集成 Spring MVC 注解 @GetMapping、@PostMapping、@PathVariable 等 Spring MVC 常用注解,开发者无需额外学习新的注解规范。
与 Spring Cloud 生态无缝整合
自动集成 Ribbon 或 LoadBalancer 实现负载均衡。
自动集成 Hystrix 或 Resilience4j 实现服务熔断与降级。
支持服务发现(如配合 Eureka、Nacos 等注册中心,自动解析服务名对应的地址)。
支持请求压缩、超时控制等配置
1
2
3
4
5
6
7
8
9
feign: client: config: default: connect-timeout: 5000 read-timeout: 5000 compression: request: enabled: true
负载均衡 简单的讲就是怕你一个服务挂了或者压力太大,就多搞个服务出来;
像这样新建一个就行:
GateWay 新建一个网关模块,里面引入如下还有nacos
1 2 3 4 5 6 7 8 9 <dependency > <groupId > org.springframework.cloud</groupId > <artifactId > spring-cloud-starter-gateway</artifactId > </dependency > <dependency > <groupId > org.springframework.cloud</groupId > <artifactId > spring-cloud-starter-loadbalancer</artifactId > </dependency >
application.yml网关配置,其中predicates为匹配的路径
1
2
3
4
5
6
7
8
9
10
11
12
13
14
15
16
17
18
19
20
21
22
23
24
25
26
27
28
29
30
31
32
33
34
35
36
37
38
spring: config: import: nacos:pa-gateway-service-prod.yml cloud: nacos: server-addr: 127.0 .0 .1 :8848 gateway: globalcors: cors-configurations: '[/**]' : allowedOriginPatterns: - "http://localhost:8080" allowedMethods: - "GET" - "POST" - "PUT" - "DELETE" - "OPTIONS" - "HEAD" - "PATCH" allowedHeaders: "*" allowCredentials: true maxAge: 360000 add-to-simple-url-handler-mapping: true discovery: locator: enabled: true routes: - id: pa-system-service uri: lb://pa-system-service predicates: - Path=/admin/**,/auth/**,/user/** - id: pa-ai-service uri: lb://pa-ai-service predicates: - Path=/chat/**
sa-token拦截器配置 Spring Cloud Gateway 是基于 Netty 响应式架构 的网关,它不支持 Spring MVC 中的 WebMvcConfigurer 和 Interceptor(MVC 拦截器依赖 Servlet 环境,而 Gateway 是非 Servlet 环境)。
使用 WebMvcConfigurer 和 InterceptorRegistry,这是 Spring MVC 的拦截器配置方式 ,仅适用于传统 MVC 项目(如 Spring Boot Web 项目),但在 Gateway 中完全不生效。
正确作法:使用 Gateway 全局过滤器 + Sa-Token 响应式适配
参考官方文档:网关统一鉴权
直接上代码:
1
2
3
4
5
6
7
8
9
10
11
12
13
14
15
16
17
18
19
20
21
22
23
24
25
26
27
28
29
30
31
32
33
34
35
36
37
38
39
40
41
42
43
44
45
46
47
48
import cn.dev33.satoken.reactor.filter.SaReactorFilter;import cn.dev33.satoken.router.SaRouter;import cn.dev33.satoken.stp.StpUtil;import org.springframework.context.annotation.Bean;import org.springframework.context.annotation.Configuration;import top.hepingan.pacommon.exceptions.ExceptionMessages;import top.hepingan.pacommon.msg.Result;@Configuration public class RoutePathFilter { @Bean public SaReactorFilter getSaReactorFilter () { return new SaReactorFilter () .addInclude("/**" ) .addExclude("/favicon.ico" ) .setAuth(obj -> { SaRouter.match("/**" ).notMatch("/auth/**" ) .check(saRouterStaff -> StpUtil.checkLogin()); SaRouter.match("/admin/**" , r -> StpUtil.checkPermission("admin" )); }) .setError(e -> Result.error(ExceptionMessages.TOKEN_LAPSE, 401 ) ).setBeforeAuth(r -> { SaHolder.getResponse() .setHeader("Access-Control-Allow-Origin" , "*" ) .setHeader("Access-Control-Allow-Methods" , "*" ) .setHeader("Access-Control-Max-Age" , "3600" ) .setHeader("Access-Control-Allow-Headers" , "*" ) .setServer("Zeus" ); if (SaHolder.getRequest().getMethod().equals(HttpMethod.OPTIONS.toString())) { SaRouter.back(); } }); } }
引入依赖:
1 2 3 4 5 6 7 8 9 10 11 12 13 14 15 16 17 18 <dependency > <groupId > cn.dev33</groupId > <artifactId > sa-token-redis-jackson</artifactId > <version > 1.35.0.RC</version > </dependency > <dependency > <groupId > cn.dev33</groupId > <artifactId > sa-token-spring-boot3-starter</artifactId > <version > 1.35.0.RC</version > </dependency > <dependency > <groupId > org.apache.commons</groupId > <artifactId > commons-pool2</artifactId > </dependency >
配置参考:
1
2
3
4
5
6
7
8
sa-token: token-name: token active-timeout: -1 is-concurrent: true is-share: false is-log: false token-style: uuid
如果启动网关报错:
1
2
3
4
Description: The bean 'saTokenContextFilterForServlet', defined in class path resource [cn/dev33/satoken/spring/SaTokenContextRegister.class], could not be registered. A bean with that name has already been defined in class path resource [cn/dev33/satoken/reactor/spring/SaTokenContextRegister.class] and overriding is disabled. Action: Consider renaming one of the beans or enabling overriding by setting spring.main.allow-bean-definition-overriding=true
则在网关配置文件里添加:
1
2
3
4
spring: main: web-application-type: reactive allow-bean-definition-overriding: true
Sentinel 他是什么?
一句话讲就是可以自定义熔断规则以保证服务器流量请求安全
先在gateway下引入依赖:
1 2 3 4 5 6 7 8 9 <dependency > <groupId > com.alibaba.cloud</groupId > <artifactId > spring-cloud-starter-alibaba-sentinel</artifactId > </dependency > <dependency > <groupId > com.alibaba.cloud</groupId > <artifactId > spring-cloud-alibaba-sentinel-gateway</artifactId > </dependency >
然后再在gateway.yml里添加配置:
1
2
3
4
5
6
spring: cloud: sentinel: transport: dashboard: 127.0 .0 .1 :8080 port: 8719


![[生气]](https://i1.hdslb.com/bfs/emote/3195714219c4b582a4fb02033dd1519913d0246d.png@40w_40h.avif) )
)