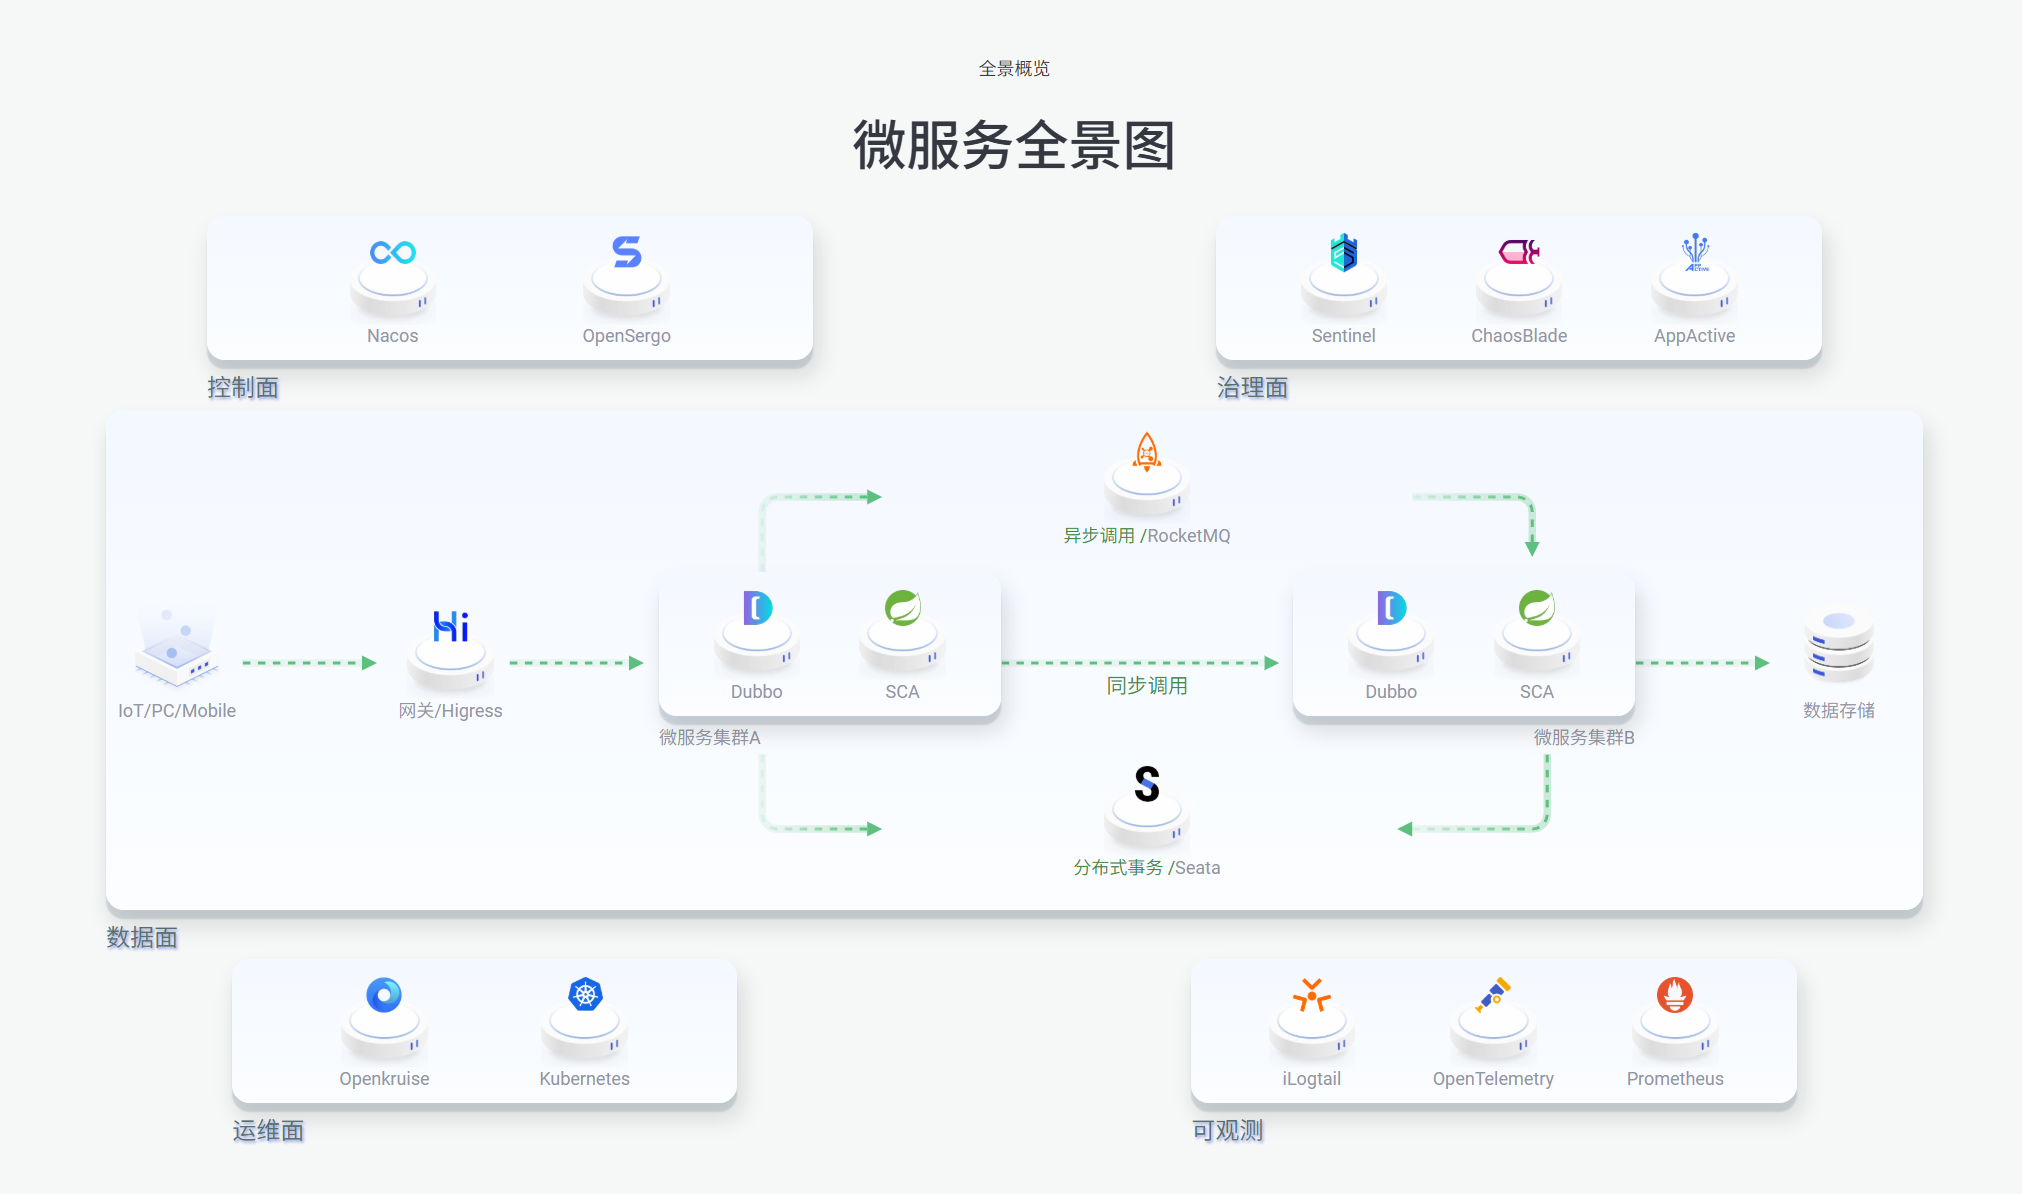
我的精华教程springcloudSpringcloudAlibaba全家桶项目架构搭建教程,从零设计微服务架构(包含Nacos+RabbitMQ+Sentinel)
何平安自己学了三年Java总结出来的Springcloud-alibaba微服务架构模板
模板介绍
其中相关技术和中间件包含:
- Mysql 8
- Redis
- Sa-token
- Mybatis-plus
- Ali Oss
- Nacos
- RabbitMQ
- Sentinel
- Docker
- 以及一些小杂件(fastjson,Druid连接池,lombok…..)
不用全部了解,比如你不想用rabbitmq直接在代码里面删除对应依赖和代码以及yml配置就行
SpringCloud版本组件之间有严格的依赖,本次采用的版本对应关系如下:
| Spring Cloud Alibaba Version |
Sentinel Version |
Nacos Version |
RocketMQ Version |
Seata Version |
| 2023.0.1.0 |
1.8.6 |
2.3.2 |
5.1.4 |
2.0.0 |
| Spring Cloud Alibaba Version |
Spring Cloud Version |
Spring Boot Version |
| 2023.0.1.0 |
Spring Cloud 2023.0.1 |
3.2.4 |
(改模板中没有使用RocketMQ,而是RabbiitMQ-3-management)
环境配置
MySQL
使用了两个表作为测试,直接创建表就行(数据库默认使用的名字是’cloud-muban’):
1
2
3
4
5
6
7
8
9
10
11
12
13
14
15
16
17
18
19
20
| create table orders
(
order_id bigint auto_increment
primary key,
order_name varchar(200) not null,
amount double not null,
user_id bigint null,
username varchar(200) null,
created_time datetime not null
)
comment '订单';
create table user
(
user_id bigint auto_increment
primary key,
username varchar(200) not null,
password varchar(250) null,
role varchar(10) not null comment '角色'
);
|
Nacos
如果你要使用nacos,我使用的是docker安装,持久化使用的mysql,一键安装指令:
1
2
3
4
5
6
7
8
9
10
11
12
13
14
15
| docker run -d ^
--name nacos-mysql ^
-p 8848:8848 ^
-p 9848:9848 ^
-e MODE=standalone ^
-e SPRING_DATASOURCE_PLATFORM=mysql ^
-e MYSQL_SERVICE_HOST=host.docker.internal ^
-e MYSQL_SERVICE_PORT=3306 ^
-e MYSQL_SERVICE_DB_NAME=nacos_config ^
-e MYSQL_SERVICE_USER=root ^
-e MYSQL_SERVICE_PASSWORD=123456 ^
-e MYSQL_DATABASE_NUM=1 ^
-e JVM_XMS=512m ^
-e JVM_XMX=512m ^
nacos/nacos-server:v2.3.2
|
当然启动后你会发现报错,那是因为你没有初始化mysql数据库表,下载我下面的sql语句或直接复制,然后新建一个nacos_config数据库运行就行:
sql文件下载地址:https://img-hepingan.oss-cn-hangzhou.aliyuncs.com/page/mysql-schema.sql(文件下载地址失效了可以去官方下载对应版本的文件找到mysql-schema.sql或私我)
1
2
3
4
5
6
7
8
9
10
11
12
13
14
15
16
17
18
19
20
21
22
23
24
25
26
27
28
29
30
31
32
33
34
35
36
37
38
39
40
41
42
43
44
45
| server:
port: 9000
spring:
cloud:
sentinel:
transport:
dashboard: http://127.0.0.1:8080
port: 8719
gateway:
globalcors:
cors-configurations:
'[/**]':
allowedOriginPatterns:
- "http://localhost:8080"
allowedMethods:
- "GET"
- "POST"
- "PUT"
- "DELETE"
- "OPTIONS"
- "HEAD"
- "cloudTCH"
allowedHeaders: "*"
allowCredentials: true
maxAge: 360000
add-to-simple-url-handler-mapping: true
discovery:
locator:
enabled: true
routes:
- id: cloud-system
uri: lb://cloud-system
predicates:
- Path=/auth/**
- id: cloud-order
uri: lb://cloud-order
predicates:
- Path=/order/**
codec:
max-in-memory-size: 1048576
servlet:
multipart:
max-file-size: 10240MB
max-request-size: 10240MB
|
1
2
3
4
5
6
7
|
ali-oss:
endpoint: 'oss-cn-hangzhou.aliyuncs.com'
accessKey: ''
secretKey: ''
bucketName: 'img-'
domain: 'https://img-.oss-cn-hangzhou.aliyuncs.com'
|
1
2
3
4
5
6
7
8
9
| server:
port: 9002
spring:
rabbitmq:
host: localhost
port: 5672
virtual-host: /
username: admin
password: 1234
|
- cloud-parent父配置(即所有模块都引用了):
记得修改为自己的mysql’和redis密码和数据库连接
1
2
3
4
5
6
7
8
9
10
11
12
13
14
15
16
17
18
19
20
21
22
23
24
25
26
27
28
29
| mybatis-plus:
mapper-locations: classpath:mapper/*.xml
configuration:
map-underscore-to-camel-case: true
cache-enabled: false
jdbc-type-for-null: 'null'
spring:
datasource:
type: com.alibaba.druid.pool.DruidDataSource
driver-class-name: com.mysql.cj.jdbc.Driver
url: jdbc:mysql://127.0.0.1:3306/cloud_muban?useUnicode=true&serverTimezone=Asia/Shanghai&characterEncoding=utf-8&zeroDateTimeBehavior=convertToNull&autoReconnect=true&allowMultiQueries=true&useSSL=true
username: root
password: 123456
data:
redis:
timeout: 10s
lettuce:
pool:
max-active: 200
max-wait: -1ms
max-idle: 10
min-idle: 1
database: 1
host: 127.0.0.1
port: 6379
password: ''
|
RabbitMQ
依然是docker安装:
1
| docker run -d --name rabbitmq -e RABBITMQ_DEFAULT_USER=admin -e RABBITMQ_DEFAULT_PASS=1234 -p 15672:15672 -p 5672:5672 rabbitmq:3-management
|
账密为admin/1234
在cloud-order模块的test里有个MQTest类可以测试你的mq弄好没,记得新建个simple.queue队列;
Sentinel
官网:home | Sentinel
本次使用的版本是1.8.6,官网下载地址:https://github.com/alibaba/Sentinel/releases/download/1.8.6/sentinel-dashboard-1.8.6.jar
下载好后直接在当前文件夹cmd运行
1
| java -jar sentinel-dashboard-1.8.6.jar
|
默认密码为sentinel/sentinel
其它说明
common中一些类的教程参考视频:https://www.bilibili.com/video/BV1a9nGz4EwE/?spm_id_from=333.1387.homepage.video_card.click&vd_source=190aa40e29cf9c29c0ec0fe896bdef1f
项目发现问题了欢迎+q1973016127私聊我哦~